Which SPF Should I Use For My Skin Type?

Let’s start with the basics. What does SPF stand for?

SPF stands for sun protection factor. It is a measure of how long a sunscreen will protect you from the sun’s rays. And yes, the higher the number is the more protection you get.

Let’s talk number…. 

If you would compare SPF 30 and SPF 50; the main difference between them is how often you need to apply your sunscreen.

And, no, that one time you used SPF last summer will not still protect your skin. You actually need to re-apply it if you are spending a long time under the sun and even in winter.

If you are using an SPF 30, you would probably want to re-apply it in 2 hours. On the other hand, SPF 50 would probably be still effective on your skin for up to 4 hours. (Please note that these estimates depend on your skin type. We will get there!)

spf 50

But isn’t SPF 50 also stronger than SPF 30? 

Yes, it is. If SPF 30 blocks 97% of UVB, SPF 50 blocks 98%. So, the difference is not that high, but the effective period is longer.

Well, that was easy, right? But wait. There’s more!

Not every sunscreen is the same. There are 2 main types of sunscreens; which are physical and chemical.

The difference is quite basic.

  • Physical sunscreen basically sits on the top of your skin and reflects the UVA and UVB rays. These sunscreens will be effective as soon as you apply them to your skin. It is basically like wearing an invisible clothing.
  • The chemical sunscreens, on the other hand, get fully absorbed to your skin. They convert UV rays into heat and gets rid of them. As they are much lighter than physical sunscreens, it takes longer for your skin to absorb them. However, you can easily apply your other skincare products or makeup on top of it. And they are more suitable for everyday use.

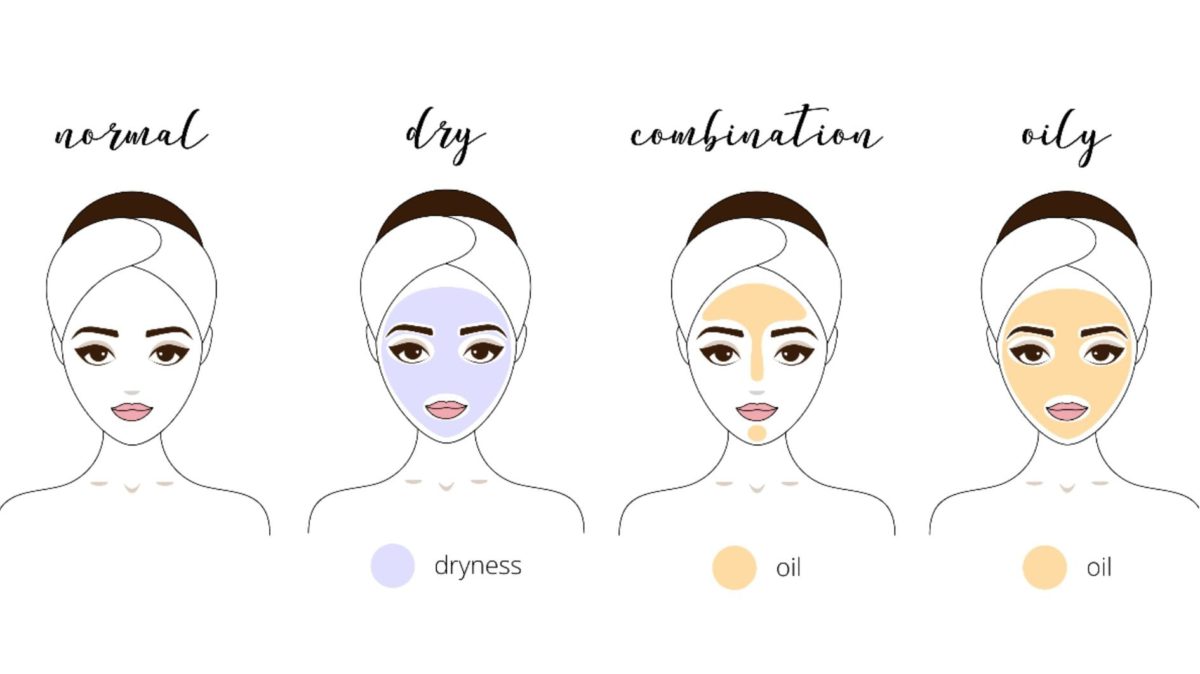
Best SPF for your skin type 

As we know, you can categorise your skin type as normal, dry, oily, combination skin. When it comes to SPF, we need to look at your skin more in-depth. Such as; acne-prone, mature, or ageing skin. And then you can choose the right SPF for your skin type.

If you don’t know your skin type, you can find it <here>

spf for normal skin

SPF for normal skin

For those who are lucky enough to have normal skin, every SPF would be suitable to use.

As we mentioned before, chemical sunscreens are more suitable for everyday use and easier to mix with your other skincare products and makeup.

All you need to decide is the strength of your SPF. Depending on the weather, if you are not going to spend much time outside, you can choose 15 SPF. But if you are planning to do some gardening under the sun, you can go up to 100 SPF!

You can re-apply your SPF as it is advised on the directions to use.

Expert recommendation; Mesoprotech light water antiaging veil 50+

spf for oily skin

SPF for oily skin

Midday shine, unsettling makeup, and the greasy look.

If you have oily skin, you must be already familiar with your foundation giving up, and your skin showing a thick layer of grease during the day.

Adding any physical sunscreen to oily skin would cause quite a discomfort and your skin may appear even greasier.

We would recommend you to choose a chemical sunscreen enriched with minerals, so your skin would stay matte during the day while getting protected by the sun’s harmful rays.

People with oily skin usually have the habit of cleaning the excess oil from their face during the day. If you are also doing the same thing, make sure to re-apply your SPF after clearing your skin.

Expert recommendation; Obagi Sun Shield Matte SPF50

spf for dry skin

SPF for dry skin

If you have dry skin, you would especially want to protect yourself from suntan.

When the skin burns, it loses its moisturise and gets dry. Often it makes the top layer of skin to peel off; which causes redness and pain.

For dry skin, we would recommend you to use a high-percentage sunscreen. Ideally, an everyday moisturiser which also includes sunscreen.

Alternatively, you can mix thick moisturiser with your sunscreen and apply. This way you can make sure your skin to absorb all the ingredients and prevent skin dryness.

If you are using an SPF specifically designed for dry skin, you should follow the directions of use to determine how often you should apply it. However if you are mixing your SPF with a moisturiser, you might want to re-apply it more often as mixing it with other creams will decrease its intensity.

Expert recommendation; OBAGI360 HydraFactor SPF30

spf dor combination skin

SPF for combination skin

If you have combination skin, you are probably dealing with oily T-zone and dry cheeks areas. And different areas with different skincare needs, it can be frustrating to maintain your regimen.

If you would have the patience and budget, your ideal sun protection would be a mixture of products. However, it may not be the most convenient.

For the best results with easy maintenance, you can prefer SPF with a powdered finish with a thin layer. This way if you need to moisturise certain areas of your skin, you can mix SPF with your moisturiser. But also prevent the oil break and shiny look on your skin.

If you are using an SPF designed for combination skin, make sure to follow the directions to re-apply on the right time.

Expert recommendation; Mesoprotech mineral matt antiaging fluid 50+

SPF for acne-prone skin

You might think that using SPF or moisturisers will cause more acne breaks on your skin. But actually, it is quite the opposite.

Drying out your skin could cause more oil production, which leads to more acne breakouts. So you should make sure to protect your skin from suntan!

Choosing a sunscreen with high protection but without any oily residue would be the best option for your skin.

Also, make sure to use a non-comedogenic SPF which means that it will not cause acne.

Don’t forget to re-apply your SPF if you are spending a long period of time under the sun.

Expert recommendation; Mesoprotech mineral matt antiaging fluid 50+

spf for ageing skin

SPF for ageing/ mature skin

As skin ages, it loses its ability to retain moisture. And it gets more likely to have hyperpigmentation, fine lines, wrinkles and brown spots.

And without a doubt, sun protection becomes a more important element.

For mature skin, we would recommend choosing an SPF with high percentage with an oil base, antioxidants and firming properties.

Expert recommendation; Mesoprotech nourishing antiaging oil 50+, Mesoprotech antiaging facial sun mist, and Obagi Professional‐C Suncare SPF30

spf for skin types

Which ingredients you should look for in your SPF

As we recommend using SPF daily, it is important not to forget that this is a part of your skincare regimen. And you should make sure, the active ingredients of your SPF are good for your skin health.

We’ve listed some of the good ingredients our favourite brands are using.

  • Collagen

Increases the presence of heat shock protein

Promotes elasticity and firmness

Prevents photo-ageing


  • Hyaluronic Acid

Provides hydration at the epidermal level

Enhances the elasticity and firmness of tissues


  • Chia Seed Oil

Provides elasticity and nutrition

Strengthens the barrier function


  • Mattifying Particles

Eliminates excess oil and shine

Leaves skin with a velvety matt finish


  • Vitamin E

Provides antioxidant and anti-ageing


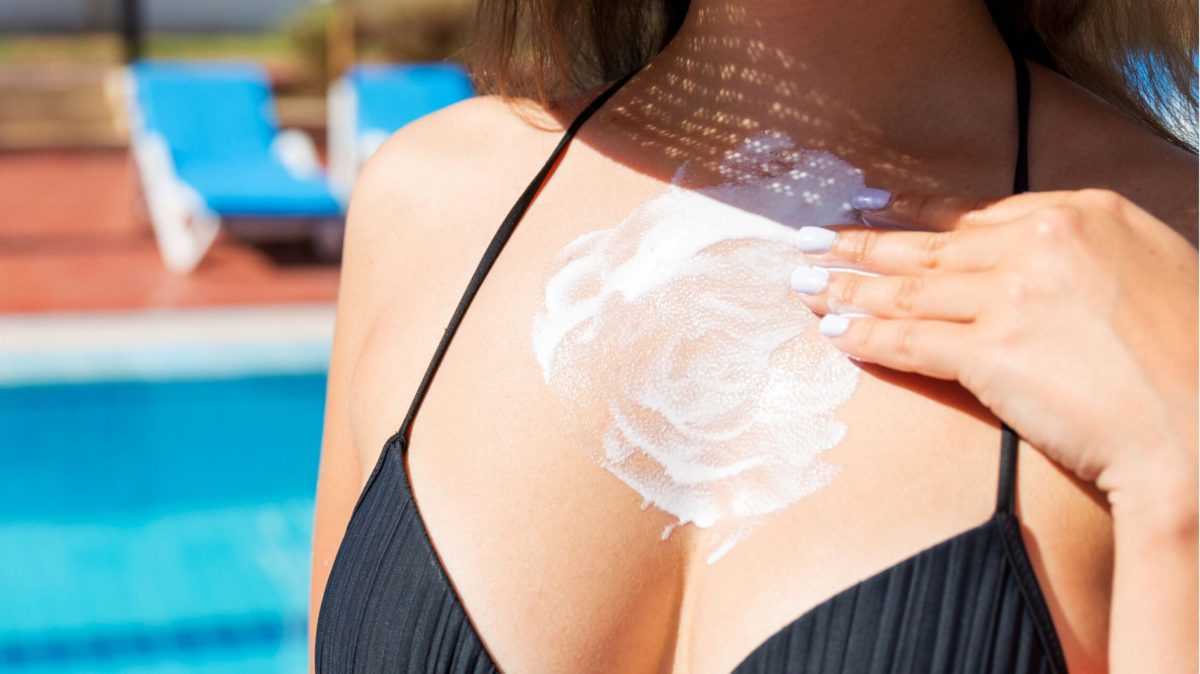
How much SPF should you apply?

Our founder and skin expert Lucy Xu explains; “For your face and neck, you can use your index finger to measure. Cream from your second knuckle to the tip of your finger is enough.”


sun protection

Commonly missed areas with SPF

You should apply SPF to all parts of your skin where it gets direct sun exposure.

However, sometimes some parts of the body get missed.

  • Sides and back of the neck

If you have long hair, you might think it would be covering your neck at all times. But it is not correct. During the day, we get exposed to the sun’s rays from different angles. The sides of your neck can easily stay under the sun. Also, tying up your hair during the day may cause a sunburn on the back of your neck if you haven’t applied SPF.

Make sure to apply SPF to all your neck and not just on the front.


  • Top of the ears

Just like the back of your neck, top and behind of the ears are often forgotten when it comes to sun protection. If you are spending long times under the sun, your ears may become an accidental burnt spot.

Wearing a hat is also an effective way to protect your skin from the sun’s dangerous rays. But remember, if you are wearing a baseball cap, it will not give your ears any protection.


  • Top of hands

The tops of your hands are especially exposed to the sun. While driving, cycling or gardening, your hands are very vulnerable to the sun unless you are wearing protective gloves.

And protecting your hands from the damaging sunburns can also prevent the signs of premature ageing such as sunspots and freckles.


  • The upper chest

You protect your face, and also remembered to apply SPF to all your neck. But what about the top of your chest, where your neckline meets your top?

Your skin on the top of your chest gets exposed to the sun more than you think.

So please remember to apply a generous amount of SPF to your chest where it is not covered with clothing.

Which SPF is the most suitable for your skin?

Your skin is unique, so should be your skincare.

If you have any questions about which skincare or SPF to prefer for your skin needs, we offer free e-consultations with our skincare experts.


Contact us to book yours today! <click here>


Hydrafacial Side Effects

[vc_row][vc_column][vc_column_text]Hydrafacial is one of the most popular treatments in the beauty industry today. Every celebrity, social media star and influencer seems to be talking about it.

What nobody is asking though is….

What are Hydrafacial side effects?

When it comes to your skin, and especially your face, you want to know you are doing the right thing. Because a facial worked wonders for an Instagrammer, it doesn’t mean it will work wonders for you.

And nobody wants to hide away because of a bad breakout or flaky skin.

If you have read online Hydrafacial reviews they are totally positive.

In fact, Hydrafacial is one of the most positively reviewed treatments in the aesthetics world, with thousands of 5 star approval ratings.

Still this doesn’t mean it will work for you.

hydrafacial side effects 

So what are the Hydrafacial side effects?

Major negative side effects are rare.

Some people have reported having an allergic reaction to certain ingredients. This should all be discussed at your consultation to avoid any issues.

Because Hydrafacial is a non-invasive procedure using hydradermabrasion, (which means it uses water and suction to clean and clear the skin) it is well tolerated by most people.

It will not cause rashes, inflammation, or peeling as seen with other facials or skincare products. With no irritation, you can apply make-up right after. Following aftercare advice will extend the results of your Hydrafacial and reduce the risk of any side effects.

Hydrafacial advice

To limit any negative side effects of a Hydrafacial your practitioner should explain to you the following points in more detail during your consultation.

  • Advice should include avoiding sun exposure, sunbed or tanning sprays or fake tan for 3 to 6 weeks before your treatment.
  • Cold sore sufferers are advised to start prophylactic anti-viral therapy before treatment.
  • Avoiding strong topical creams (Retin-A, glycolics, etc.) for a week before and after treatment.
  • Delaying using stronger topical retinoid (Vit A derivatives) creams for 2 days after your treatment

Failure to follow these guideline could see you experience an adverse side effects to your Hydrafacial.

hydrafacial

Side effects

  1. You may experience increased bruising if you are on blood thinners or aspirin.
  2. If you have recently used Retin-A or retinoid your skin may be more sensitive and red.
  3. After the procedure your skin may feel a bit sensitive for a couple of hours afterwards.
  4. You may experience minor swelling of or around your eyes or lips.
  5. During the treatment you may feel a cool and soothing scrub-like sensation.
  6. Some feel a slight tingling sensation during the application of the light chemical peel

If you were hoping to read horror stories and warnings about Hydrafacial,the evidence is not there. (See medical references at the end of this page with links to studies.)

It is a gentle procedure, suitable for all ages and all skin types regardless of your age or colour of your skin.

 Who should not have a HydraFacial?

  • If you are pregnant or breast feeding,
  • If you have recently had light or laser treatment, chemical peel, facial steroid injection, cosmetic injectables, recent microdermabrasion, facial waxing, surgical procedure, sun burn, skin infection or recent changes in growths or moles in the area treated area.

You should defer treatment If you have any of the following active or unstable medical conditions :

  • Epilepsy
  • Cancer
  • autoimmune disease
  • diabetes

Read through our positive top 10 side effects of a Hydrafacial….

Hydrafacial logo

The 10 Biggest Hydrafacial Side Effects

1.No discomfort

Hydrafacial is a non-laser, non-invasive and non-ablative treatment, making it virtually painless. It is often described as having your face lightly massaged.

2.Even Complexion

Antioxidants in Hydrafacial serums can address a number of skin concerns as well as rejuvenating worn out  and tired looking complexions. Sunspots can be reduced and inflammation calmed. Breakouts and acne can be go from spotty and red complexion into a more even tone.

3.No need to pre-plan ahead

Hydrafacial treatment lasts 30-60 minutes. You can have it done on your lunch break or whenever you have the time. Unlike some chemical peels where you need to plan your downtime and prepare yourself for your skin flaking off and hiding away, you can get on with your life straight after your treatment.

4.Super Smooth Skin

If you have an uneven complexion Hydrafacial uses gentle exfoliation with its patented water based ‘hydradermabrasion’ to remove dead skin cells to uncover a fresh skin.

5.Crystal Clear Skin

Clogged pores are also deeply cleaned of dirt and debris along with the dead skin cells. Oily, congested skin is detoxified leaving your skin clean and clear. A visible reduction in oil and pore size combine to give your skin a clearer complexion.

6.Velvety Softer skin

Hydrafacial intensively nourishes your skin with nutrient rich serums including hyaluronic acid. The moisturiser hydrates and attracts water into the skin and prevents moisture loss. Flaky dry skin can be transformed. Going from rough to smooth, hard to soft to the touch in 60 minutes or less.

6.Decreased appearance of wrinkles

Peptide infusion is ideal to tackle wrinkles. Hydrafacial infuses skin with peptide proteins which are scientifically proven improve the appearance of wrinkles. Improved firmness in key areas can reverse the signs of ageing.

7.Boosted confidence

With Hydrafacial, results speak for themselves. Having a luxurious clinic experience will make you feel and look a million dollars. You will find it hard to stop touching your new smooth and super soft skin afterwards!.

8.No downtime

Hydrafacial is gaining a reputation as the go to facial to get ready for that special occasion or red carpet event. Before your wedding, anniversary or birthday celebration Hydrafacial will get your face sparkling and looking its best in no time.

9.Great for Acne

If acne is a regular problem for you Hydrafacials love acne!. With the optional LED light after treatment this can destroy any remaining bacteria preventing future breakouts.

10.Customise your treatment

Hydrafacial can be customised to focus on your specific skin concerns. A range of serums can target everything from dark circles under eyes to pigmentation and wrinkles. LED light enhancement are a great way to finish your treatment for maximum glow and radiance.

 Next steps if you live in London

If you live in London and are interested in having a Hydrafacial please get in touch for a free consultation. We are Londons largest independent laser and skin specialists with 9 clinics across London. We are proud to have been trusted by Londoners for their skincare needs since 2008.

hydrafaical md near me map

Medical references:

Hydradermabrasion: an innovative modality for nonablative facial rejuvenationhttps://pubmed.ncbi.nlm.nih.gov/19146604/

Skin resurfacing procedures: new and emerging optionshttps://www.ncbi.nlm.nih.gov/pmc/articles/PMC4155739/[/vc_column_text][/vc_column][/vc_row]

Skin Care During Ramadan

If you are fasting, you should take extra care during the Ramadan for your skin health. 

Not having enough water, disturbed sleep, stress and not consuming the necessary food groups due to lack of time; can impact your body and skin.

We’ve put together a guide to help you and your skin this Ramadan.

You will find out: 

  • How to care for your skin during Ramadan.
  • How much water should you drink for healthy skin.
  • Importance of choosing the right skincare products.
  • Effects of enough sleep for skin health.
  • Why you should stay away from makeup during Ramadan. 

Drinking Enough Water For Your Skin

Dehydration can cause dryness, fine lines, wrinkles and sagginess on your skin.

During Ramadan while not drinking any water during the day your daily water intake doesn’t change. And we all know how important staying hydrated is for your health.

Make sure you consume enough water from iftar to sahur.

How much water do you need though?

For a healthy adult, it is advised to consume 1.5 – 2 lt. of water each day.


You can calculate how much water you should drink a day with this simple method as advised by World health organisation.

Water (in litres) to drink a day= Your Weight (in Kg) multiplied by 0.033.

So if you are :

A female weigh 55kg you should drink 1.8 litres per day

55 x 0.0033 = 1.8

A male weighing 80kg you should drink 2.64 litres per day

80 x 0.0033 = 2.64

Make sure to consume your calculated amount of water evenly over time between the sunset and sunrise. This way your body will benefit the most.

Use The Right Skincare Products

Staying hydrated is the first important step. Next you need to take extra care to prevent damaging your skin cells.

Missing out on important vitamins and minerals while fasting may affect your skin’s self-defence and its ability to maintain a healthy ph and oil balance.

Choose your cleanser based on your skin type.

For oily skin: Use a cleansing gel.

For dry skin: Use a milk cleanser

Always get expert help to choose the correct skincare products suitable for your skin type and conditions. If you have any doubts about which products to use, our clinicians would be happy to offer you their expert help <click here>.

Choose A Rich Moisturiser 

Moisturising should already be a part of your daily skincare routine. However, while not drinking enough water during the day during Ramadan, make sure to give your skin that extra hydration boost by using a rich moisturiser. Choose a moisturiser packed with minerals.

The right moisturiser for your skin type will penetrate deeper into your skin, offering better results.  

  • Our Expert Recommendation: Dermaquest Essential B5 Hydrating Serum. It attracts and retains moisture in your skin, enhances skin firmness, softness and elasticity, preventing ageing and dehydration. It is also suitable for all skin types.

Don’t forget !

Even if you have oily skin, you still need to use moisturiser. However, you should always choose the right skin products, suitable for your skin type.

If you don’t know your skin type, follow our 7 simple steps to find out your skin type self-test <click here>.

Pay Extra Attention To The Eye Area

The skin around your eyes is much thinner, it is also more prone to damage.

Skin dehydration causes irritation, fine lines and wrinkles; and it is more visible in the eye area. Choose a suitable eye serum for extra care during Ramadan.

Don’t Forget To Use SPF

During Ramadan with the lack of water during the day, you are more vulnerable to heat and so is your skin.

While your skin cells get dehydrated, they are more prone to burns.

So make sure to use SPF at all times.

Choose sun protection which also provides moisturising. This way you can hydrate your skin while protecting from the sun’s dangerous rays.

For more information about how to use SPF.

Have A Balanced Diet

Heavy eating at sunset and before sunrise, and missing out on nutritious food groups due to the limited time on eating may have a negative effect on your skin.

Consuming fruits and vegetables is essential for your immune system. But it is also necessary for your skin health.

Vitamin A, B, C, E, and K are keystones for skin health. Also biotin, folic acid, iron, and Omega 3 are very important.

Make sure to create balanced meals with good protein, and a rainbow of vegetables.

Also, try to stay away from sugar and sugary drinks as they are one of the biggest enemies of your skin. If they are eaten before your fasting, they will make you feel hungrier sooner.

Yoghurt is very beneficial for your skin health and a great probiotic. It is also rich in protein so it will keep you full.

As are eggs! And eggs are perfect for natural skin masks.

Read about our homemade skin masks recommended from our expert clinicians.

Get Enough Sleep

Having enough sleep has many health benefits. For your mind, focus, body, and of course your skin.

As your sleep gets disturbed when you wake up to eat before sunrise, try to arrange your sleeping pattern so it can help you with getting enough sleep without the disruption.

A good night’s sleep is key to glowing skin.

Take A Break From Makeup

Applying heavy makeup blocks your skin pores.

This can lead to acne and other skin imperfections.

During Ramadan, if you are not consuming enough water during the day, it affects your skin’s natural balance. Your skin cannot fight naturally against makeup (which it sees as an outside threat). This may cause skin problems.

Try to go for your natural look, or apply a very thin layer of makeup if you need to.


We hope that our tips help your skin  have a healthier Ramadan. For any skin related questions, our expert are ready for free e-consultations. Contact us for more details.

We wish you a great month of peace and kindness.


The Ultimate Guide To Pigmentation, Its Causes & Treatments

Thank you for visiting our ultimate guide to pigmentation. We hope after you have finished reading it you will be better prepared to tackle your pigmentation. (8 min read)

This guide covers the following areas:

What is pigmentation?

What causes skin pigmentation?

Pigmentation and hyperpigmentation

Common pigmentation issues

What can I do about hyperpigmentation?

Treatments for hyperpigmentation

What works best for your skin tone?

Dark circles

Effective treatments for dark circles

What is pigmentation?

According to the Mariam Webster dictionary pigmentation is :

“a colouring matter in animals and plants especially in a cell or tissue”

What causes skin pigmentation?

We can suffer from pigmentation issues whatever age, sex, skin tone and ethnicity we are.

Skin pigmentation can result in an over or under production of melanin. Melanin is produced by the meloncytes in the skin cells. When there is an over production of pigmentation it is called hyperpigmentation, when not enough is produced it is called hypopigmentation.

Skincare experts and Doctors are not sure of the exact reason for certain skin pigmentation changes. Other conditions like sun spots have obvious causes.

Pigmentation and hyperpigmentation

Pigmentation of the skin is a misleading phrase as all skin contains pigmentation. When it is unwanted or a problem it is best referred to as hyperpigmentation.

Hyperpigmentation causes dark patches or spots. They can be beige, brown, red or purplish coloured and can appear anywhere.

Common pigmentation issues

The sun is one of the biggest causes of pigmentation, along with pregnancy and hormonal changes. Below are the most common forms of pigmentation. Sometimes it can be severe and noticeable like vitiligo or albinism. Let’s look at these two extreme forms of pigmentation first.

What is Vitiligo?

Pop star Michael Jackson is said to have suffered from vitiligo which saw his skin colour change over the years from dark to light.

  • Vitiligo happens when pigment-producing cells (melanocytes) die or stop producing melanin.  Melanin is the pigment that gives your skin, hair and eyes their colour. It triggers your immune system to attack and destroy the melanocytes in the skin. Vitiligo is estimated to affect around 1% of the worlds population with it more noticeable on people with darker skin.

What is Albinism?

  • Albinism is a rare inherited disorder caused by the absence of an enzyme that produces melanin. There is a complete lack of pigmentation in eyes hair and skin. Albinos have an abnormal gene stopping the body making melanin. There is no cure for albinism. It is vital people with albinism use sunscreen all the time because they have a higher chance of skin damage and skin cancer. It can occur in any race but is most common among caucasian.

Other severe skin pigmentation issues can occur due to autoimmune conditions, hormonal changes and sometimes shock.

Pigmentation seen in clinics everyday is not a severe as the two conditions above. The following types of pigmentation are more common, starting with one of the most common Melasma.

What is Melasma?

Pigmentation caused by pregnancy is called Melasma. (It is also known as ‘chloasma’ or ‘pregnancy mask’). The name comes from melas which is the Greek word for black. It results in brown or greyish patches of pigmentation developing usually on the face.

It is more common in women with up to 50% affected during pregnancy, in people of colour and those who tan easily.

Hyperpigmentation From Sun Damage Sun Spots (Solar Lentigenes)

When on the face it is normally found on the most exposed areas of the cheeks, nose and forehead. They can look like freckles or age spots or just as uneven patches of colour. Sun spots or age spots are commonly found in people over 50 but they can also appear in younger people who have spent many unprotected hours in the sun.

Hyperpigmentation from Acne Scarring

Scarring from acne can also cause hyperpigmentation. It is often red and can be very noticeable and difficult to cover up as the skins surface is damaged and uneven.

Acne pigmentation

This is caused by the extra melanin which can form around damaged skin. It is often referred to as hyperpigmentation and can be removed with careful skin care and laser treatment. Lasers destroy the discoloration and is suitable for all skin types

The darker pigmentation left behind by acne can be as bad as the acne and is more permanent. If an acne breakout gradually fades away red, brown or purplish discolouration, where the spots once were, can permanently be left behind.

premier laser

Freckles (Lentigenes / Ephelides)

Lentigo is one freckle and lentigene are many. Freckles are a type of hyperpigmentation. The medical term for them is ephelides. They happen because more melanin is produced unevenly across the skin. This causes little spots of discolouration known as a freckle.

Freckles are not caused by the sun. They’re genetic. They do, however, appear when the skin is exposed to the sun.

What can I do about hyperpigmentation?

The best protection against it to use sun protection daily. When it is caused by medication or by certain illnesses it is best to speak to your doctor.

Before seeking treatment have the area checked by a skincare expert, doctor or dermatologist. Any skin changes should also be checked by a medical professional.

Once you are given the go ahead for treatment and have been advised there is nothing dangerous about your pigmentation, or any recent changes, you can take the next step to have them treated. But what treatments are available?

Treatments for hyperpigmentation

There are many miracle cures, over the counter lotions and creams all claiming to work wonders for skin pigmentation. The internet is full of them. And they are usually quite expensive. Only a few of these treatments will have an effect for most people.

That is why it is important to speak to a professional so they can point you in the right direction. Trying to navigate through all the claims and promises can leave your skin worse off and out of pocket for hundreds of pounds.

Some of the best proven treatments for pigmentation are listed below.

Pigmentation/ Lightening Creams

Over-the-counter (OTC) treatments use specific ingredients to reduce pigmentation in either gel or cream form. Many have stronger varieties available via prescription. Applied once or twice a day, over time they help lighten the skin over time.

  • Common ingredients in OTC products include:
  • hydroquinone
  • liquorice extract
  • vitamin B-3 (niacinamide)
  • N-acetylglucosamine


  •  WHO IS THIS FOR?

Creams or gels are most effective on flat spots like age spots or melasma. They are also good for patches of discoloration across most skin types.

OTC products are easily available and a more affordable option for hyperpigmentation. They can take longer to work than professional treatments.

If you are buying online only purchase products from websites and manufacturers you trust.

Face Acids

Face or skin acids exfoliate or shed the top layer of your skin. The new skin cells replace older ones evening out your skin tone making it smoother.

Face acids are available OTC at beauty clinics and chemists. Always look for an acid content of 10% or less from a trusted source. A higher percentage may increase risks of side effects and are best left to professionals in a clinic setting.

Popular acids include:

  • vitamin C (in the form of l-ascorbic acid)
  • alpha hydroxy acids, such as glycolic, lactic, citric, malic, or tartaric acid
  • kojic acid
  • azelaic acid
  • salicylic acid


  •  WHO IS THIS FOR?

Face acids are ideal for mild hyperpigmentation on lighter skin tones.

Retinoids

Retinoids are some of the oldest skincare ingredients used in the beauty industry. Derived from vitamin A, their small molecular structure lets them deeply penetrate into the skin layers below the epidermis.

Retinoids can be either prescription or OTC, with OTC being weaker. If after a few months you don’t notice results ask your skincare provider about retinoid tretinoin (Retin-A).


  • WHO IS THIS FOR?

OTC retinoids may be safe for all skin tones. If you have darker skin, check with your skin care provider if you plan on using them long term.

Also retinoids may not be the first line of defence as they are more often used to treat wrinkles than hyperpigmentation.

Microdermabrasion & Dermabrasion

Dermabrasion goes much deeper into the layers of the skin then microdermabrasion and is more invasive with a longer healing time required. The results are more effective as a result of the invasive nature.

For microdermabrasion a diamond head is used along with a unique nourishing serum. Tiny crystals are “blasted” over the skins surface in a controlled way.

Old and damaged skin is smoothed away with clear, fresh skin left behind.  As the upper skin layer is removed collagen production is encouraged. A course of treatments is ideal to target scars or pigmentation.

Practitioners can use various methods to lessen the pain to a tingling or scraping sensation so you should not worry about it being painful.

The treatment must only be carried out by professionals. Too much or over vigorous treatment can damage the skin and actually cause new pigmentation to form. If applied correctly microdermabrasion is very effective. It can be used on a wide range of pigmentation issues including acne scarring.


  • WHO IS THIS FOR?

Microdermabrasion works best on superficial scars and for people with lighter skin. Your skincare provider will help you decide whether it is the right treatment for you.

Dermabrasion works on more serious pigmentation and is far more riskier, requiring a longer healing process of 10-14 days. There is also a risk of infection as layers of skin are scrapped away.

Chemical Peels for Pigmentation

A chemical preparation is used to take off upper layers of skin. The most popular chemical is glycolic acid mixed with other skin nurturing ingredients.

The preparation is applied by brush and left like a normal facial peel. When it is removed the skin sheds. This happens over the course of a few days. Applying sun block after a chemical peel is critical. If not more pigmentation may occur as the new fresh skin is very vulnerable and delicate.

Two popular peels many clinics offer are the Cosmelan Depigmentation Peel and the Dermaquest Skinbrite Peel.

  • Cosmelan:

Cosmelan is a skin whitening treatment which is effective for reducing dark spots and patches. It is a one-off peel that is suitable for anyone suffering from deep pigmentation or melasma. It blocks the melanin production in problem cells so gets to the root of the problem.

After the peel you will need an extensive home care kit to help improve your results in the weeks and months following the treatment.

  • DermaQuest SkinBrite Peel:

This is a more gentle pigmentation peel. It is ideal for targeting sun spots, age spots and freckles. It works by exfoliating the skin encouraging the damaged skin.

  • Pigmentation Facial Or Skin Lightening Peel

Skin lightening peels are also fantastic treatment for rejuvenating the skin where age spots or darker pigmentation is visible. Over a course of treatments, a special Alpha Hydroxy treatment is applied under clinical conditions. This removes a layer of skin revealing fresh, undamaged skin beneath. The treatment is not painful and the results are superb.


  • WHO IS THIS FOR?

Chemical peels are best suited to treat age spots, sun damage, melasma and blotchy skin. They also work best on lighter skin tones and may provide quicker results than face acid products.

Laser Pigmentation Removal:

Non invasive and pain free, laser treatment is very effective against many forms of pigmentation. It is becoming increasingly popular because of the fantastic results and technology used.

Todays lasers are more advanced and sophisticated then earlier models and are now very successful on a range of skin types too.The laser beam targets the unwanted pigmentation in the skin cells. It destroys the pigmentation without affecting the surrounding tissues.

The pigmentation is then removed from the body naturally over time through its immune system. Laser pigmentation removal is not painful or uncomfortable. After 2-6 sessions most will notice  improvements in skin.


  • WHO IS THIS FOR?

Laser treatment work well on Freckles, Sun Spots, Hyperpigmentation, Age spots (solar lentigines), Flat pigmented birthmarks (congenital melanocytic naevi) and is suitable on all skin types.


IPL For Pigmentation Removal:

IPL is a type of non-ablative (fractional) laser treatment. Non ablative means it heats up the skin and is gentler then ablative procedures which destroy the layers of skin and require a longer healing period.

Intense Pulsed Light treatment  (IPL) is great for lighter skin tones. It is different then laser treatment as it uses multiple wavelengths to target larger areas. Unlike laser which focus a targeted laser on an exact spot at an exact wavelength.

Collagen production and growth is stimulated within the dermis. It normally requires multiple sessions.

IPL is used for overall pigmentation issues, but flat spots especially respond to this treatment. It may also help reduce the appearance of wrinkles, spider veins, and enlarged pores.


  • WHO IS THIS FOR?

IPL works best for people with fair skin.

What works best for your skin tone?

Skin tone affects the intensity and length of treatments. People with all skin tones can use the treatments mentioned above but if you have a darker skin tone you may need more time for treatments to work.

  • Lighter skin tones respond well to most hyperpigmentation treatments

The following may be ruled out if you easily tan or have darker skin:

high-beam lasers

IPL therapy

  • Medium skin tones should consider

chemical peels

microdermabrasion

  • Darker skin should consider:

glycolic or kojic acid

microdermabrasion

lower-strength chemical peels

laser treatments – only used at lower intensities over a larger number of sessions

Dark Circles Under The Eye Dark (Preorbital Dark Circles)

Dark circles under the eyes or preorbital dark circles occur when the skin below the eyes shows blood vessels and pools. They appear blue in people with fair skin as skin only lets in the blue wavelength of light.

If they appear darker it is because under eye circles reflect light from blood under the thin skin. The contrast is greater and more apparent the lighter your skin. Skin under your eyes is only 0.5mm thick which compares to 2mm thick on rest of your body.

Causes range from:

  • Seasonal allergies, sleeping too much or too little, eczema, stress, or even crying. In these cases dark circles might disappear by themselves.
  • Excessive exposure to the sun or even skin pigmentation abnormalities.
  • Ageing could also be guilty as you lose the fat and collagen around your eyes, and that magnifies what may not have seemed like a dark circle just a few years ago.
  • Genes and ethnicity also play their part.

Effective Treatments for Dark Circles

Dark under eye circles can be treated by a number of ways.

Combines microneedling and radiofrequency.  It stimulates collagen production and helps to plump and firm the skin. The skin under the eyes becomes fuller unable to reflect blue light as much and reducing the dark appearance.

Puffiness or “bags” often come with dark circles. Dermal fillers can help restore brighter, more youthful eyes. Injectables are not for everyone and can be seen as a step to far but they do work well and are an option.

This works by penetrating beneath the skins surface to start cell regrowth. Heat targets the connective tissue which makes it pull together and lift. It reaches deep into the layers stimulating cell regrowth and eliminating dark circles.

Designed for ages 30 – 50, it can either be used to preventative or restore.  Results develop over eight weeks and it is considered to be highly effective, safe as well as FDA approved.


With so many effective and affordable treatments on offer, you don’t need to suffer with skin pigmentation any longer. The first step you can take today is to apply good quality high SPF sun cream to your skin. The next step should be to contact a qualified skin care practitioner to examine and discuss your skin and draw up a treatment plan for you.

Why not book a free consultation with one of our skincare specialists today. It’s free, the only cost is your time.


How To Find Out Your Skin Type

We are all born with our skin type. This is set by our genetics and ethnicity which never change. However, did you know our skin type can?

Your skin type is mainly based on how much oil is produced in your follicles.

And each skin type requires a different skincare regimen. Before you choose your skincare routine and products, you need to know your skin type.

Not exactly sure???

Don’t worry.

With our self-test, you can find out exactly your skin type in 7 simple steps.


Step 1 – Clean/ Prepare your skin


First things first. Let’s get your skin back to its natural form. Without any makeup, chemicals, or dirt/dust.

Remove any makeup and wash your face with a plain non-acidic facewash which doesn’t include any moisturisers. Make sure to use lukewarm water as hot water would dry your skin.

Pat-dry your skin with a gentle towel rather than scrubbing it harshly.

Do not apply any products and do not touch your face.

Wait for 1-2 hours.

This way you will allow your skin to get back to its natural form without any outside elements.

You are now ready to examine your skin and find out your skin type.


Step 2 – Check your T-Zone


Your T-Zone is usually the oiliest area of your face as it has a higher amount of oil glands.

The area includes your forehead, nose, and chin.

This area is called the T-Zone because it is shaped like the letter T! (A very creative name!)

Next pat your T-Zone with a tissue and check if there is any oil rubbed off on it.

Oil :  you either have an oily or combination skin.

No Oil :  you are more likely to have normal or dry skin.


There are still a few more steps before we can say for sure what your skin type is so continue to step 3 (Make sure to complete all steps before your conclusion.)


Step 3 – Notice how your skin feels


This is the easiest step. All you need to do is listen to yourself and understand how your skin feels.

  • Does your skin feel itchy?

You might have sensitive skin.


Oily skin will feel greasy immediately.


  • Or does your skin feel tense or tight?

That is a sign of dry skin.


Step 4 – Look in the mirror


If you have a certain skin type, such as oily or dry; it is should be visible the mirror.

Oily skin would easily spotted as you will start seeing grease or shine on your skin.

If you notice flaky patches on your face, you are most likely to have dry and/or sensitive skin.

Your face also may not feel the same all over. Most people with combination skin experience greasy look on their T-Zone and especially on their nose areas. But they feel tightness on the cheeks or even sometimes in their foreheads.

Make sure to note every observation you have during your self-test to find your skin type. 


Step 5 – Pinch your skin


Not that hard! Just gently.

Oily skin may tend to have more breakouts, but having oily skin actually has an advantage.

Higher oil produced in follicles wards off wrinkles better than dry skin as the oil keeps skin moister and smoother.

In other words, oily skin ages slower as it wrinkles less.

In this step of your skin type test, if you pinch your skin you can create an outside effect to see your skin’s potential level for getting wrinkles.

  • If you have dry or combination skin types, your skin will easily wrinkle after pressure is applied.
  • If you have oily skin, it will remain smooth.


Step 6 – Look at your pore size


Those tiny dots you see on the surface of your skin are called pores

What you may not now, they are actually openings of hair follicles. And your pores are responsible for the production of your skin’s oils.

And you’ve guessed right again when your pores fill up with too much oil and/or dirt, that is how you usually get spots.

Pores are more noticeable on some parts of your face then others. For example, your forehead and nose.

  • When you check your skin pores in the mirror, if they are visible but not large, you probably have normal skin.
  • Take a few steps back from the mirror. If you still can see your pores you might have oily skin.
  • On dry skin, pores will not be as visible.


Step 7 – Watch your makeup


If you have waited 1-2 hours after your washing your face it’s time to start examining your skin.

Usually, your skin gets back to its natural state by this time. Think about how many clues your skin gives you during the day.

If you have never done this before it can be surprising by how much you can learn by just doing nothing but just observing you skin and its sensations.

Watching your make up is one of the easiest ways to determine your skin type.

If you have oily skin, you will probably get that midday shine on your face. And your foundation will come off while your mattifying powder is already long gone.

So, if your skin makeup is giving up 3-4 hours after you’ve applied it, you probably have oily skin.

On the other hand, while applying your makeup if your foundation looks cracked or flaky, you are more likely to have dry skin.


We hope you now you have a better understanding of your skin type.

It is important to remember every skin type requires a different skincare product and regimen.

Now you know your skin type, why not consult our skin experts to find out which skincare is the best for you?

Book your free e-consultation today!


Hydrafacial or Microneedling?

[vc_row][vc_column][vc_column_text]Hydrafacial or microneedling? If you had to choose one…….which one would it be?

They are both fantastic treatments for many skin issues and a must when it comes to your skincare routine.

How do you choose between them?

What’s the differences?

What are the pros and cons of each treatment?

After reading through this blog you will know the answer to those questions and more.

First we’ll take a look at microneedling.

Microneedling

There are many devices performing microneedling. Years ago it was only done in clinics or spa. Today, with handheld and electronic devices, treatments can be done at home too.

The dermaroller is the most common microneedling tool. It looks like something you find in your kitchen. It has a handle attached to a rolling cylinder with hundreds of mini spikes on. You can buy dermarollers with different length spikes, depending on the results you want to achieve.

Many clinics use an electronic microneedling pen instead of a dermaroller. Dermapen is one of the most popular brands.  It is a more comfortable treatment with quicker recovery due to the precise vertical insertion of micro needles. It also works better on the whole face reaching areas the dermaroller finds difficult.

As Hydrafacial cannot be performed at home we will compare it to Dermapen microneedling in a clinic.

Collagen induction therapy

Microneedling is a collagen induction therapy which is popular worldwide. It is considered a minimally invasive skin rejuvenation treatment.

Designed to stimulate your bodies collagen production, it causes micro punctures to the skin using its stainless-steel surgical grade needles.

Several treatments are needed for best results, although results can be seen from one treatment. For skin conditions 4 to 6 sessions are required.

Microneedling is classed as a progressive treatment. Results appear once new collagen is formed, taking to up to 6 weeks.

It can be undergone by anyone considered in good health and is seen as a step up from facial peels or similar treatments.

Advantages of microneedling:

Microneedling is ideal for :

  • improving skin thickness
  • improving skin quality
  • stimulating and boosting collagen
  • stimulating and boosting elastin
  • improve fine lines wrinkles
  • acne scarring
  • stretch marks
  • to plumpen rejuvenate skin
  • anti-ageing treatment for sun spots
  • loose skin
  • enlarged pores
  • pigmentation

Disadvantages of microneedling:

Microneedling is minimally invasive. It pierces the skins surface so could lead to scarring.  There is also the risk of infection which is greater if performed at home. Longer dermaroller needles may bend and cause larger wounds which can also lead to scarring and infection.

Pain

With microneedling the depth of the needles can be set from a gentle 0.5mm to a more aggressive 2.5mm. The higher the setting the more uncomfortable treatment will be. It also depends on your tolerance for pain.

Numbing cream or a topical anaesthetic can be applied before. This increases time spent in a clinic as it must be applied 30+ minutes before you start.

What are The Side Effects of Microneedling?

While minimally invasive side effects include minor irritation and redness for a few days after.

Other side effects can include

  • swelling
  • bruising
  • dry and flaky skin
  • pigmentation changes
  • sensitivity to sunlight – (avoid sun exposure for 7 days after each session.)
  • infection
  • bleeding and scarring if done improperly

hydrafacial

Hydrafacial

Is a multi-stage beauty treatment which cleanses, purifies and revitalises your skin. There are many types of Hydrafacials, The most popular is the 6 stage Hydrafacial lasting 60 minutes. Express 3 stage Hydrafacials lasting 30 minutes are also available.

Treatments can be customised with add-ons called “boosters” to tackle specialised skin issues like tags or brown spots.

How It works 

Hydrafacial is suitable for all skin types. It is known for removing impurities from your skin.

The technique firstly cleanses and exfoliates the skin with the patented Hydrafacial spiral tip. Then using a vortex extraction nozzle, pores are vacuumed to unclog & remove dead skin cells.

Finally, specialised hydrating and nourishing cooling serums are pushed into the pores. The serum usually consists of hyaluronic acid, peptides and antioxidants.

  • cleansing and exfoliating

Cleanse + Peel- The first step is a deep cleanse to remove old, dead and damaged skin.

  • extracting impurities

Extract + Hydrate- Unclogging of pores with gentle suction removes dirt and debris.  Nourishing hydrating serum are infused to quench the thirsty skin.

  • infusing serums into the skin

Fuse + Protect- Finally your skin is drenched in revitalising antioxidants and peptides to heal your skin.

Advantages

Hydrafacials are quick and easy. They can get your skin event-ready in less then an hour.  No pre-planning or downtime is required.

It is also suitable for regular use to slowly build and improve your skins appearance over time. Results are noticeable after just one session. With no downtime you can apply makeup straight after.

  • even out your skin tone pigment,
  • reduce the appearance of fine lines and wrinkles
  • correct dark spots
  • smooth out your skin.

What are the side effects of Hydrafacial?

Side effect are rare. They may include a slight redness and tightness for 60 minutes after the treatment.

microneedling model

Is Hydrafacial Painful?

There is no pain associated with this procedure at all.

How to choose between microneedling and Hydrafacial?

Need special occasion gorgeous skin in a hurry?

Choose Hydrafacial for instantly glowing skin.

Fade acne scars?

Chose microneedling for collagen building and to smooth the appearance of scars.

Relax and rejuvenate?

Hydrafacial is superb if you want to pamper yourself and feel a million dollars!

Aging skin?

Microneedling will firm your skin

Breakout?

Hydrafacial is ideal to clear your pores.

Dry and dull skin?

Hydrfacial will intensely hydrate your skin.


microneedling with a dermapen

Summary

Microneedling is a better option then HydraFacial if you have deep, permanent acne scars and other facial scarring and conditions listed earlier. It is great if you want to replace elasticity and firm your skin. It is not a good choice if you are prone to infections or are unable to tolerate slight pain or needles.It is recommended for all skin tones like Hydrafacial.

Microneedling is amongst the best minimally invasive treatments to also rejuvenate skin.

Hydrafacial is superb for quickly and deeply cleansing and refreshing your skin. (Check out our Hydrfacial before and afters). It hydrates and reduces fine lines and wrinkles and improves your general appearance as well as the benefits listed above.

Next steps if you live in London

If you live in London near one of our 9 clinics why not speak to us today about having a microneedling or Hydrafacial treatment. We are London’s largest independent laser and skin specialists trusted by over 500,000 Londoners since 2008 for their laser and skin treatments[/vc_column_text][/vc_column][/vc_row]

How To Shave Correctly for Women

If you are worried about the interruption to your laser hair removal treatment due to the lockdown and the effects it will have,  we have prepared a guide for you where you will learn

  • A brief history of the hair cycle
  • Premier Laser free offer to you
  • Shaving, the basics

Why do you need multiple laser hair removal sessions anyway?

Our laser expert and director Lucy Xu explains why:

Hair grows in 3 different stages.

  • The Anagen stage – which is the active growth stage,
  • The Catagen stage – the transition period,
  • The Telogen stage – also known as the resting phase.

She continues “while laser targets the root of the hair, it can only work on hair in the Anagen stage, as this is the only time the root is connected to Dermal Papilla”. As we don’t know which hair is on the Anagen stage at the time of your treatment; we can only destroy about 10% of the total hair per session – the ones in the Anagen stage. On your next session the laser will target and destroy the next group of hair in the Anagen stage. And so it continues, until all the hair has been destroyed, over several sessions and months. That’s why multiple sessions are needed for hair removal.

Is shaving the only option?

The options for removing hair will affect the hair in different ways. Waxing or epilators target the hair root and can change the hair growth cycle (Anagen, Catagen, Telogen stages) this will reset your treatment so is a big no-no as you will have to start your treatment over. Plus laser targets and destroys the root of the hair. Epilation and waxing will get rid of the hair but the hair will come back even stronger. So your previous laser sessions to weaken the hair roots go to waste. If you cannot wax and epilate that only leaves one option…Shaving!

But I don’t want to shave my face!

If you are having treatments on your face i.e. sideburns, upper lip, or full face; you may not want to shave. Which is absolutely fine, but avoid waxing or plucking! We recommend you trim your facial hair with scissors if you can, or try cover up with makeup. For dark facial hair, the best way to hide it is by using a thick foundation followed by powder and light blush on the hairy area to blend the colour. However, if you are half way through laser treatment, you may only have light hair on your face. To hide it, you can use a light liquid foundation only followed with powder.

Getting back to shaving

Even though we recommend shaving in between laser sessions as a last resort, you should try to keep to a minimum.The less you shave the better results you will get when you come back for laser hair removal treatment.

In case you have forgotten: Shaving tips 101

Of course we’re all expert shavers but if you haven’t done it in a while it’s easy to forget the basics. Here’s a quick reminder.

(Plus with these tips, you’ll prevent ingrown hair, razor burn, or any nasty skin irritations.)

1) Take a warm shower or bath

They are great for softening your skin and opening up your pores. You’ll get the most out of your shaving and lessen the possibility of side effects.

2) Exfoliate

While in the shower use a loofah or gentle scrub to exfoliate the area you want to shave. This will get rid of dead skin and help the razor to glide over your skin, giving you a closer and longer-lasting shave.

Do not exfoliate after shaving, as it may cause additional irritation to your skin. 

3) Apply shaving cream or gel

If your skin is well-hydrated and you are using the right products you will reduce the risk of skin irritations, ingrown hairs or razor burns. Never try to shave without using shaving cream or gel, as it may burn off your skin or results in cuts.

For a smoother shave, immediately after your shower, while your skin is still wet, apply some oil. Rinse off. Then use the shaving cream or gel.

4) While shaving

Use a fresh razor. An old or clogged razor won’t work well and may irritate your skin. Also make sure you don’t go over the same are too many times and rinse the razor frequently.

5) After shaving

Rinse thoroughly with cold water to close your pores then use a soft towel and lightly pat dry. Moisturise with light body oil or cream. While soap and water dry your skin, shaving also will increase this effect. Using a generous amount of moisturiser will help to protect your skin. Also try to prevent shaving while you are on your period, as your skin will be more sensitive.

Shave the right way

Change your shaving technique depending on the part of your body you are shaving.

Shaving legs;

It is best to shave in long, steady strokes.. Also, be careful around the bonier areas as you don’t want to any cuts. Bend your leg while shaving your knees and stretch while shaving the back of your leg. Also, you can stretch your foot to opposite directions while you are doing your ankles.

Shaving underarms;

Underarm hair usually grows in different directions. So shaving in one direction may not be enough. For the best result, lift your arm above your head and shave in short strokes in all directions.

Wait for 1-2 hours before applying deodorant. 

Shaving bikini area;

As the skin on your bikini area is more sensitive, you should shave gently. Shave in the direction of the hair growth first, and then for a closer shave, you can go against the hair growth direction.

Make sure to use special creams after such as Bepanthen or nappy cream which are thicker and richer and you will eliminate the irritation, as many moisturisers may not be suitable for your skin on the bikini area.

Avoid a sun tan

Even though most of us are spending time at home locked away from the sun, if you spend time in your garden or balcony sunbathing please make sure to use SPF at all times to avoid a tan! If your skin is tanned from sun exposure, sunbed or tanning lotion you would need to wait 4-6 weeks for it to fade so you can re-start your treatment. If you have any questions please contact us.

If you are just considering starting your laser hair removal why not take advantage of our free e-consultations and get the ball rolling. During the e-consult you can ask all your questions to our skin experts and once life goes back to normal all you have to do is to pop in for a patch test.

Laser Hair Removal Aftercare

[vc_row][vc_column][vc_column_text]

Laser hair removal aftercare

24 – 48 hours

  • Avoid intense exercising such as gym and fitness classes
  • Avoid heat treatments such as hot baths, saunas, steam rooms and hot showers bikram yoga.
  • Avoid intense exercising such as gym and fitness classes
  • Swimming in chlorinated water is not advised.
  • Do not use creams containing bleach or steroids.
  • Avoid scented or perfumed products such as soaps, creams or colognes and perfumes.
  • Do not touch, scratch or pick at your skin to avoid further irritation.
  • Do not exfoliate or use a peel
  • Wear a high factor SPF
  • No shaving – even if you spot a stray hair !

Aftercare 14 days following Laser hair removal 

  • Limit UV exposure
  • No self tanning
  • Avoid waxing, plucking, threading as this will disrupt your hair cycle and effect results
  • No depilation creams for same reason as above
  • Avoid exposing your skin to harsh weather conditions.

For 6 weeks + preparation for next laser session

  • Use a high factor sun protection SPF30+
  • Limit sun exposure and do not use sunbeds.
  • Keep skin moisturised in preparation for your next laser hair removal session


Laser hair removal aftercare does not require any complicated routines to follow for weeks after your appointments. This is because laser hair removal is a relatively simple process with little recovery time.

However, it is important that you take time to care for your skin after the procedure. Caring for your skin means it will remain healthy and moisturised.

Aftercare immediately following your laser session

Immediately after your laser hair removal session, you can expect your skin to be slightly red and irritated, this is totally normal. It might even feel like mild sunburn. For many people, this disappears within a few hours.

But for others, it may take a few days before it totally goes. If you notice any of your skin blistering, you need to discuss this with the clinic where you had the treatment as this will be a reaction which shouldn’t happen.


laser hair removal aftercare

How to soothe your skin during aftercare 

If you find the redness after your laser hair removal treatments to be uncomfortable and sore, there are things you can do to help ease the redness.

  1. First you should get some cold compresses and apply these to the area of skin that’s red, to help any swelling go down. You might consider using ice if you don’t have any cold compresses , or a cold bath. This should soon have your redness going down.
  2. Making sure the area of skin is kept clean is also an important point, to avoid infections.
  3. You should also moisturise the area. Moisturising creams aid in the recovery of the skin in the areas that were treated with the laser. The clinic you go to will probably recommend some creams for you to use.
  4. Consider using a daily moisturiser in the days leading up to your next treatment, if you have purchased a package are having a course of treatments. This will also keep your skin generally healthy and supple and give you optimum results when having your laser hair removal procedure.

In general, many people feel fit and ready to go back to work immediately after treatment. Others may feel they need a little rest, but this shouldn’t be more than a day or too. Depending on the length of treatment, area of skin being treated and skin type, all after care guidelines can vary and you should speak to your clinic.

Laser aftercare and what to look out for

There are a number of side effects you should also look out for during the after period following your laser hair treatment. These are mostly minor and temporary in the hours, days and weeks after your laser hair removal session. If you do experience any lasting side effects you should contact your clinic and speak to your practitioner.

Redness, irritation and slight swelling

As mentioned this is the most common side effect that will need your attention and aftercare. They generally do not last long and your skin may look and feel like it has been plucked or waxed. You can request a numbing cream on your next laser session to help you manage the sensation if it was uncomfortable.

Irritation should go down within a few hours of your laser session.

Changes in pigmentation

You may also notice colour changes where you had laser. It may get slightly darker (hyperpigmentation) or lighter (hypopigmentation) following laser hair removal.

These will tend to fade away over time with and the skin returning  to normal.

Crusting

You may experience your skin crusting over in the affected area. Although inconvenient it is a minor issue and you should not worry too much about this. To avoid scarring and scabbing take care of the area with a good quality moisturiser.

Changes in pigmentation

You may also notice colour changes where you had laser. It may get slightly darker (hyperpigmentation) if you have light skin or lighter (hypopigmentation) if you have dark skin following laser hair removal.

These will tend to fade away over time with and the skin returning  to normal.

skin infection

Like other hair removal methods, by damaging hair follicles this carries a risk of  infection risk.

Treat the affected area as a wound while healing takes place and contact your GP or clinic who can advise you. Do not apply strong over-the-counter (OTC) antibiotic creams to large areas of your skin if an infection occurs.

laser hair removal

Rare side effects

Laser hair removal is a safe, FDA approved treatment. Thousands of men and women undergo laser hair removal every year. With all cosmetic procedures risk are attached. Uncommon side effects after laser hair removal can include:

Burns and blisters

There is a risk of burns and blisters if laser hair removal is not done correctly. So always have your laser performed by an experienced practitioner in a reputable clinic.

With an experienced practitioner burns and blisters are extremely rare. A cooling Aloe Vera gel is applied after treatment and is an effective natural way to cool the skin. You can continue to use Aloe Vera gel as aftercare following your laser sessions.

If you do experience burning then contact your GP or clinic who can advise you further.

Scars

Scars may form if the correct aftercare is not followed. It is important to treat your skin like it is sunburnt to avoid damaging it further. Protecting it from sunlight, and checking for signs of infection and keeping it moisturised, are key.

To get the most out of your laser hair removal sessions and to maintain healthy skin it is important you look after you skin following every laser hair session. Following a good aftercare routine and regularly monitoring your skin will help you and your skin to keep looking at its best for longer

[/vc_column_text][/vc_column][/vc_row]

Facials And Skincare Tips At Home

Normal life as we know it is on hold. Classes are cancelled, offices are closed, no more
dinner parties or meals at your favourite restaurant… We can cope with that but…

…how do we cope with beauty clinics being closed and left alone to deal our skin and our out
of control hair growing everywhere!. No more popping in for a laser, hydrafacial or hifu
treatment, at least for now.

Well if you can’t come to the clinic, the clinic will have to come to you!.

We have prepared an essential beauty list for you so you can give yourself some well-
deserved pampering and care.

We asked all our clinicians to share their favourite homemade recipes for skincare. The great
news is all the ingredients can be found in your fridge!

So, let the pampering begin!


First, Exfoliation!

Before each mask or treatment, you should start with proper exfoliation.“; says our expert
clinician Anna from our Clapham clinic.

But why exfoliation is important?

Anna continued “Good exfoliation removes the dead skin cells clogging the skin and reveals
fresh new cells below. Getting rid of the dead skin leaves your skin looking fresh and
healthy. And more importantly, good exfoliation opens the way for your skin masks,
moisturisers or other beauty products to penetrate your skin more deeply. And you can
benefit more from your beauty treatment.

Anna has a simple yet effective recipe for skin exfoliation at home. All you need is 2
ingredients. To prepare your face before all the masks, you should mix;

  • honey
  • sugar

and make a nice skin scrub. Exfoliate your skin with this mixture and wash off with lukewarm water. Thank you for the skincare tip, Anna!

Fab Facial For Open Pores

There are many causes of large open pores. Such as :

  • reduced elasticity around pores
  • reduction of collagen production in the skin
  • ageing
  • makeup
  • hygiene
  • genetics

And as we know, open pores may cause acne and other skin imperfections.

But with this next amazing homemade mask, you can reduce the size of your open pores and
give your skin the perfect look it needs.

Magda our skincare expert from our Soho clinic gave us this super effective and easy to make
face-mask for open pores. It was passed down to her by her mother in Poland and she was
sworn to secrecy to never reveal the recipe, to anyone, ever….until now, so thanks Magda!

It works miracles and is already one of our favourites.
Ingredients for the face mask to eliminate open pores;

  • 1 Egg white
  • 1 lemon

1. Separate the egg white from the yolk (you can use an empty plastic bottle to do this.
Just crack the egg into a bowl, squeeze the empty bottle, place the bottle opening over
the yolk. When you release your grip the yolk will be sucked inside the bottle and you
can separate it from the egg white)

2. Whisk together the egg white with lemon juice until the mixture becomes a foam

3. Put the mask on your face for 10-15 mins

4. Wash off with lukewarm water

Results are immediate. You can make this mask 1-2 times a week.

Fantastic Facial for Hydrating the skin

Hydration is the key when it comes to healthy skin. If your skin is hydrated, it will look more
plump and youthful. Hydration also helps your skin to improve elasticity which reduces the
appearance of wrinkles.

Dehydrated skin produces more oil due to lack of moisture. Which leads to many skin
problems.

And when your skin is fully hydrated, it can flush out toxins more effectively while your skin
cells are functioning at their best.

These next recipes are coming from Lana from our Liverpool Street clinic. They explain the
generations of beauty in her family!

Ingredients for a skin hydration mask;

  • Half an avocado
  • cocoa powder
  •  Honey

1. Mash the avocado and mix with the rest of the ingredients
2. Leave the mask on for 10-15 mins
3. Remove mask with warm water.

Another fantastic recipe for hydration and brightening;

  • Banana
  • Orange juice
  • Honey

1. Mash the banana, mix up with the rest of the ingredients
2. Apply a thick layer on face and keep for 15-20 mins
3. Remove with warm water

Thanks for sharing Lana, they sound good enough to eat!.


A Facial to fight acne

Acne occurs when the pores of the skin get blocked with oil, dead skin or bacteria. It usually
appears with:

  • Blackheads
  • Whitehead
  •  pimples
  •  oily skin
  • possible scarring

But this easy to make treatment will help you reduce your acne and improve your skin. We
will always be grateful to Ilona from our Liverpool Street Clinic for this amazing skin tip.

Ingredient for face mask against acne

  • Aspirin (5 tablets crashed)
  •  1tbs honey

1. Mix both ingredients until having a smooth texture
2. Keep on face for 10 mins
3. Massage before rinsing off with water

For acne-prone skin

“Prevention is as important as the treatment”; is Lana’s skincare motto.
Acne-prone skin has the potential to develop comedones and pimples. It is often oily and
appears shiny. With this natural homemade face-mask, Lana shared, you can reduce the
likelihood of having acne on your skin.

Ingredients for acne-prone skin mask

  •  honey
  • cinnamon powder

1. Finely mix ingredients
2. Apply a thick layer and leave until dry
3. Remove with warm water


A facial to tackle Under eye puffiness

Maybe you have had one too many late nights getting through the latest series on Netflix or
up late chatting to friends with a glass of wine or two. Under eye puffiness or bags under eyes
commonly appear at any age. It gets worse the older you get though.

With ageing, the tissues around your eyes, including some of the supporting muscles around
eyelids get weaker. The fat that is supporting the eyes moves into the lower eyelids and it
causes the puffiness around eyes.

Our skincare expert Anna from our Clapham clinic shares her secret for under eye puffiness.
Every evening place two tablespoons into your freezer. In the morning, after cleaning your
face, use the cold spoons using outwards movements focusing on eyes to increase blood
circulation and reduce puffiness. For best results make sure to do it every morning for 5-10
mins.

After the skin exercise, don’t worry if your skin gets red. That only means that it’s working!
Also make sure that your curtains are closed and no one is around as they may think you lost
the plot!

We hope you enjoy these recipes from our clinicians. Go ahead and give them a try. We
would love to hear from you about your homemade skincare recipes. Email us or join our
new facebook group, or Social media, to share them. If Magda can break years of family
secrets, so can you!.

If you have always had questions about your skin, why not take advantage of the lockdown
and give us a call and speak to an expert advisor. We are offering free e-consultations for you
to ask all your skin related questions to our experts, send pictures in and have them looked
over  and analysed.

Just contact us for more information.

Laser Hair Removal In Kent

[vc_row][vc_column][vc_column_text]

Looking for laser hair removal in Kent?

If you live within travelling distance or near Bromley Town Centre then our new Kent clinic, in the historic Bromley Market Square is conveniently located for you.

You will find us near the north entrance of The Glaldes shopping centre at 11 Market Square, Bromley, Kent, BR1 1NA. There is plenty of parking and excellent transports links if you are coming from further afield in Kent.

Located in Bromley, Kent

Bromley South station is a ten minute walk away and Bromley North station a five minute walk. Our Bromley clinic is easily accessible from Sevenoaks, Dartford, Gravesham, Tonbridge and Malling, Medway, Maidstone, Tunbridge Wells and are all under an hours travel by either train or car.

If you live even further afield in Swale, Ashford, City of Canterbury, Folkestone and Hythe, Thanet or Dover and don’t fancy the extra hassle of heading into Central London, or want a change from Bluewater or Lakeside – then why not contact us today to start your laser journey.

With Premier Laser on your doorstep, we hope to save you the trouble of travelling into London or elsewhere looking for the best treatments available.

laser hair removal practitioner

Who are Premier Laser?

If you have never heard of Premier Laser please allow us a brief moment to introduce ourselves to you. Premier Laser was founded in 2008 with our first clinic in Notting Hill, London. Specialising in Laser hair removal and skin treatments, we have grown to 9 clinics now with our newest clinic opening in Bromley, Kent.

Bromley is our 9th clinic to open across London, Surrey and Kent.

Laser hair removal since 2008

Since 2008 we have delivered over 500,000 exceptional quality Laser & Skin treatments using the latest technology performed by the industries most experience expert practitioners.

As well as laser hair removal we also bring you Coolsculpting, Hydrafacial, Microneedling, Fillers and tweakments to sculpt contour and enhance the way you look and feel about yourself.


[/vc_column_text][/vc_column][/vc_row][vc_row][vc_column][vc_column_text]

kent laser hair removal

Client Focused & Latest Laser Technology

Our clients are at the heart of everything we do and this is reflected in our reviews online which we would encourage you to read.

All of our clinics are equipped with the latest in laser technology.

Our trusted laser partner over the years has been the Candela Gentlemax Pro. The same lasers are used in hospitals and medical practices worldwide.

The US company is the leading laser manufacturer in the world and its lasers are medical grade 4 rated and FDA approved. They operate on the dual wavelength of Alexandrite and Nd:YAG so can be used on light, olive and darker skin tones.

This ensures our clients receive the best treatment available. And as you expect, having performed laser hair removal every day for over 12 years we are pretty good at it!.

Experience

State-of-the-art technology in the wrong hands will not get you the results you are after. We pride ourselves in having some of the most experienced practitioners operating in the industry today.

We only employ practitioners with a minimum of three years experience so you can trust that you are in safe hands.

Hair removal in Kent

If you are considering using a local clinic make sure you find out the technology they are using and the experience of the practitioner.

If they use unbranded machines, purchased cheaply of the internet for a fraction of the cost of a Candela, and the practitioner is an inexperienced junior member of staff just out of college, you will be placing yourself at risk. At the very least you may be disappointed with your results.


hair removal in kent

Kent Laser hair removal cost and prices

Our laser hair removal prices are extremely competitive. We price match again other clinics (using the same technology- just let your clinic know if you have a quote)

For full body laser hair removal kent prices are

  • Premier Laser full body in Kent £2140
  • Other London clinics charge between £2000-£2600
  • Harley Street clinics will charge around £3500

Bikini laser hair removal prices at Bromley, Kent

  • Perianal, Feet, Toes, Bikini Line from £35
  • Brazilian £66
  • Hollywood inc PA, Buttocks £38

If you purchase packages for combined areas then the prices works out even more attractive.

Next steps

If you are thinking about laser hair removal and you live in Kent and are able to travel to our Bromley clinic why not get in touch. Our warm, friendly and professional team will immediately make you feel at ease.

We offer free consultations for laser hair removal where you can share your goals with us and talk with our experienced practitioners. The will listen to you, answer your questions and help you prepare if you decide to go ahead.  We will also perform a patch test to check your suitability.

kent laser hair removal model

While your there why not ask about our other treatments. If you are looking to restore a healthy glowing to your face and treat ongoing conditions like acne or pigmentation we have a range or treatments that can help.

If you are looking to subtly enhance the way you look by smoothing out fine lines and wrinkles, plumpen your lips or finally get rid of those stubborn pockets of fat exercise and diet cant seem to move with Coolsculpting, talk to us today.

We look forward to seeing you soon.


[/vc_column_text][/vc_column][/vc_row][vc_row css=”.vc_custom_1591348741021{background-color: #458787 !important;}”][vc_column][vc_column_text]

Kent Facts:

  • Known in Old English as Cent. 
  • Kent stretches down to the coast including historic Hastings and important transport hubs of Dover and Folkstone.
  • Called the ‘garden of England’ because of its beautiful orchards and hops fields.
  • The Royal Navy first used the River Medway in 1547.
  • In 1965 Bromley and Bexley were created from nine towns formerly in Kent.
  • Kent is the main area for hazelnut production in the UK!. 

[/vc_column_text][/vc_column][/vc_row]